Showing posts with label DIY. Show all posts

Monday, March 4, 2019

DIY: How to Turn a Tapestry into a Blanket

I love tapestries. They are fun to hang on walls and to use as curtains or tablecloths, but I was so excited when Debra from LitJoy Crate suggested that we turn the tapestry from LitJoy's Year 4 Magical Crate into a blanket!
Isn’t this tapestry gorgeous? I love the detail of Hogwarts in the background. With a sewing machine and a few supplies, including batting, thread, and fabric to back it, you can do it too! Debra finished hers in under an hour (even with a few mistakes on the way, which I know she did on purpose, just for us novices).

If you loved this tutorial, you have to check out the Debra’s blog at Housewife Eclectic. She has a tons of recipes and tutorials, many of which are Harry Potter-inspired because she’s a Potterhead, like many of us!
If you’d like to find out more about LitJoy's Magical Edition Crates, follow them on instragram @litjoycrate! You can also check out their Harry Potter-inspired products in their Magical Collection.

Wednesday, October 19, 2016

DIY Harry Potter: Beauxbatons Fleur Delacour Hat


My favorite parts about dressing up are the tiny details that add to the costume. There are also parts to the costume that make it the most recognizable. This is true for the costume of Fleur Delacour in Harry Potter and the Goblet of Fire (Harry Potter #4). When the Beauxbatons Academy arrives with their blue dresses sashaying behind them and magical butterflies surrounding their twirls, it's the Beauxbatons' hats that add the detail and make their costumes perfection.

This is what you'll need to make your own custom Fleur Delacour Beauxbatons hat:

Materials
1.) Wool felt capeline -or- wool felt hood (Jedrzejko)
2.) Flower hat shaper (I got "The Flower" hat shaper from hatshapers.com)
3.) Blue Dye (I used Rit liquid dye in "Denim Blue" from Walmart. Just make sure it matches your dress fabric, unless your wool felt already matches it)
-or-
Rustoleum Satin Wildflower Blue Spray Paint. Pick either the dye or the paint. Honestly, the results are similar. I like how my dyed hat felt smooth, but I like how my sprayed hat's brim turned up on one side and stayed there.


Honestly, I think the hat is the key to making the perfect costume. And it really is easier than I thought to make a hat. I watched a ton of videos on YouTube on how to do it from scratch - like they take this thready looking wool felting stuff that you had to pull and layer and layer and let dry and . . . it seemed like such a lengthy and expensive process when you can just buy a pre-shaped hood or capeline like these for between $10-15:

White Wool Felt Capeline from Jedrzejko - notice how this one already flares out. 

Light Blue Wool Felt Hood from Jedrzejko (these are cheaper than capelines, but are harder to shape/stretch)

I bought a capeline and a hood to test out so I could see which looked better. I think they work equally well - it all just depends on your fabric color. I bought an off-white hood (C578) and a blue (525) hood/cone from Jedrzejko because I wasn't sure of the color hues. I ended up spray painting the blue one because the color wasn't close enough to my fabric, but I think the light blue one is actually perfect in color if you compare to the movie. The off-white one, I dyed first.


Step 1: Dye your fabric. Since my fabric was a different blue than any of the capeline colors I could find, I planned on dying it. I just followed the instructions on the Rit bottle (3 gallons of boiling water, 1 cup vinegar, and half the bottle of dye). I used this big black canner because they recommend not using a pot that you cook in. Honestly, as long as you wash the pot really well afterwards (you could boil soap and water in it when you're done), I don't see a problem with using it for dying. 

If your sink water is really hot, boiling the water may not be necessary.
I just added mine to the really hot water.
It's a little scary to place the white wool into the pot, but it works really well. If for some weird reason, your dying fails, all hope isn't lost. Just jump to my alternative spray painting method (Step 5).


I swirled it around in my big black canner/pot and then let it sit for about 30 minutes. I probably could have left it for about 10 minutes and it might not have gone so dark, but I still like it. After your dye soak is done, rinse the capeline/hood until the water is clear.

Step 2: If your wool felt is already the right color, just boil some water and stick your hood/capeline in it. Otherwise, dye it first. Once the wool felt is completely wet, take it out and put on your hatshaper. You can buy just about any hat shaper from hatshapers.com! I found this one (called the flower). It is made from this really hard plastic stuff, super durable and easily reusable.

Flower hat form/hat shaper from Hatshapers.com

Step 3: Then the fun part! Pull and press with your hands until the hat fits the shape of the hat shaper. I probably spent 15-20 minutes doing this. The hardest part is getting the top to fit to the tip of the hat shaper. I ended up using my iron on a steam setting to get it perfect.

Once it is close to the shape you want, tie some yarn, ribbon or fabric around the part right before it flares to help it hold it's shape.

All I had on hand to wrap around the hat shaper was some wool yarn.
A large rubber band or even a strip of fabric would work well too.

Step 4: Let it dry. This can take a day or two. I used a couple of hand towels to soak up as much water as possible to speed up the process. 

Step 5: Trace a nice edge along the brim (I used a piece of chalk) and trim off any excess. (If you dyed it from white, you might have to use a marker or a little more of the dye to paint the edge where you cut it off. My dye didn't completely penetrate the wool, so I just used a tooth brush and a little more of the dye with water and painted along the edge. I used an old wet rag to rinse off the dye and let the hat sit back on the hatshaper for the edge to dry.

Step 5 (alternative to dying): Once that hat is shaped and dried, if you didn't dye it or the color is quite what you wanted, spray paint it! I used the same paint as I used to make my shoes
I spread out some newspaper in my garage, removed the hat from the hat shaper and sprayed just the outside. I waited about an hour and then spray painted the underside of the brim. I didn't paint the inside of the hood. I used my hands to turn up the brim on one side before it completely dried and used some crumpled newspapers to keep it tilted while drying. I think this was the key to capturing the turned up edge.


Step 6: Wear it! You hat may not tip up on one side like Fleur's in the movie. If you end up spray painting your hat (it works surprisingly well on wool felt), the hat will become stiffer. I also had some stiffener on hand for the hat I dyed (it was basically a starch spray) that I used just on the inside of the hat. You can also use mod podge painted on the inside, but I was worried it might soak through the hat so I didn't try it.


I couldn't have made the hat without this shaper from www.hatshapers.com.

If you want to get Fleur's wand, you can order it from AliExpress here.
I bought the metal core one ($12.99) because I was worried about it breaking.


I hope your hat turns out. Let me know if you find any more tips or tricks while making yours! And don't forget to check out my Fleur Delacour Beauxbatons Shoes and Fleur Delacour Beauxbatons Dress and Capelet instructions (including a free pattern for the collar and cuffs)!


XoXo,

Fleur
aka Robin
(and my little Dobby too)

Friday, October 14, 2016

DIY Harry Potter: Fleur Delacour Beauxbatons Shoes


How to Make the Fleur Delacour Beauxbatons Shoes:
Step 1: Find a pair of old shoes with a pointed toe and heel. An oxford would be the best, but I couldn't find one. I found these ankle boots at my local Deseret Industries (a used clothing store) for $6. Clean them with a cloth and soap and water. Let dry.
Step 2: Print my pattern (below) on a 8.5" x 11" paper. You may have to adjust it to fit your shoe, but the general idea should be the same. The fringe part on the pattern should fit any shoe.
Step 3: Place wax paper on top of pattern. Trace the pattern of the heel and toe onto the wax paper (I used a permanent marker). Do this twice for both shoes so that you have 2 heels and 2 toes. You don't need to trace the fringe yet. Put tape over the traced part of the pattern. You are basically turning the pattern pieces into stickers. I used a combination of painter's tape and clear tape because the shiny surface of my shoes would only allow really sticky tape to adhere to it. Cut out the wax paper/tape in the correct shapes.
Step 4: If your base color of your shoe isn't what you want as your darker color, spray paint the darker color now and allow to dry for at least one day.  Since my shoes were black, I decided to just keep the black. In the movie it is more of a navy blue with a baby blue for the heel and toe. I picked this Rustoleum Ultra Cover Satin Wildflower Blue. Splurge on a spray paint that is for indoor/outdoor use and meant to cover to plastic or fabric. Adhere the "stickers" to the shoes, making sure it sticks really well at the edges. Cover the heel of the shoe with more tape so that when you spray paint the shoe it remains the darker color.
Step 5: Spray paint the shoes. I let the first coat dry and then did another coat. Let the paint dry before you remove the tape. At this point, your shoes will look like this:


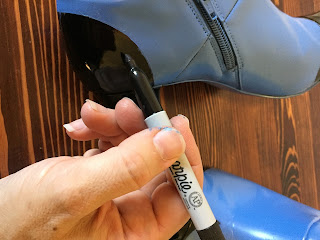
Remove the tape and clean up the edges with either some paint remover and a cotton swab, or some of the paint you used on your base coat. I even used a black permanent maker to make my edges perfect.
Using tape as a stencil/sticker isn't an exact science. There will be some bleeding of paint.
Luckily, you can fix it easily! I actually used nail polish remover and a cotton swab and then a Sharpie to fix mine.

Step 6: Cut out your fringe pattern piece, Place on top of your Leather Fabric. Pin. Cut out 2 fringe pieces. Since I got my fake leather on clearance in a maroon color, I spray painted black after I cut it out. If your leather isn't the same color as the base color of your shoe, paint it to match.


Step 7: Fold over your cut leather fringe pieces following the pattern and hot glue the fold over. Punch two small holes near the top by the fold. I used a Crop-o-dile, but you can use a hammer and a nail. Pull your leather laces or suede cording (like they use to make jewelry - I found 3mm suede cord at Joann Fabric in the jewelry-making aisle) through the holes and tie in a bow.


Step 8: Hot Glue or sew (it just depends on your shoe material) the fringe near the ankle of the shoe. If your shoe isn't a short boot like mine and it is more like a pump, you can shorten the fringe or even just tie fringe piece around your ankle using the cording and then tie it.


Before I glued on the fringe. See how I cleaned up the lines. You can't even tell I made any mistakes!

Hot glue the fringe on. You could probably use a shoe glue too.

You have to place it quick before the glue dries.

The finished product. Aren't they cute!?!

I think the fringe really makes the shoe look similar to the original in the movie.


I hope you enjoy making and wearing your shoes. Be sure to check out my posts on how to make the dress and cape (here) and how to make the hat (here)! Please send me your finished products and any shortcuts you found. I'd love to post them!

Don't they just go perfect with my Fleur Delacour Dress?
If you are throwing a Harry Potter party or book club, you have to check out my post here on Harry Potter and the Goblet of Fire and the rest of the books that we celebrated on DeliciousReads.com

XoXo,

Robin

Monday, March 7, 2016

Make Your Own Rings

Hey Bookworms! Yes you. I just put together my latest post for Delicious Reads and I thought I would share it with you. Check out how I made "The Company" rings that I like to give out at book launches and signings. I really want to make more of these in different themes. I think they would make the perfect custom gift for a book lover.

Make your own book jewelry

Here's a link to the article: DIY Custom Book-Inspired Rings and Jewelry. Enjoy!