Showing posts with label free pattern. Show all posts

Friday, October 28, 2016

DIY Harry Potter: Fleur Delacour Costume (FREE Collar/Cuff Patterns)


Okay, all you Harry Potter obsessed (including me). I'm writing this while wearing my Ravenclaw shirt and a lightning bolt necklace (thank you www.deliciousreads.com). Halloween is coming up (or your next Harry Potter Party). My friend is even going to a Harry Potter wedding soon. Don't we live in a lovely nerdy world! For our ten year anniversary of Delicious Reads, we decided to go all out and read all seven Harry Potter books and then have a huge weekend filled with book discussions, crafts, quizzes, an ultimate horcrux hunt and, of course, costumes! Since I was in charge of book #4: Harry Potter and the Goblet of Fire, I decided it would be perfect to be Fleur Delacour from Beauxbatons Academy of Magic (see my post on our activities, decor, and food ideas for your next Harry Potter Party).


Well, it's lucky I know how to sew because I couldn't find a suitable costume anywhere and the few I found online were like $600 or more. Just the hat alone was close to $100. Well, being the frugal gal that I am, I decided I could do it on my own. I researched ideas, watched way too many videos on youtube, learned all about millinery (the art of making hats), and then visited my local fabric store and used clothing store. Below are my instruction for the dress and capelet. You can find my tutorial on the shoes here and the hat here.


Here's what you need to make your dress and capelet:

The Dress:
1.) Pattern: Simplicity 8050 - 1940s Vintage (Any empire waist, flared skirt dress will do, but I liked this one because it had a collar and was long-sleeved.)
2.) Cape Pattern: I modified a McCalls 4139 pattern. I would suggest just draping fabric over your shoulders and cutting it if you don't already have a pattern.
3.) FREE Collar and Sleeve Cuff Patterns (see below)
4.) 4 yds of 60" or 4.5 of 45" Blue Silky Fabric - the color of mine was called "cornflower blue". You don't have to use real silk and I honestly hate working with it. My fabric was a polyester blend that was a little thicker.
5.) For collar and cuffs: 1/2 yd of a textured blue fabric darker than dress (I found one with a marble-like effect in flannel)
6.) For collar and cuffs: 1/2 yd of plain blue fabric slightly darker than texture fabric
7.) Blue Thread (I used Coats 4250)
8.) 10 1/2" Buttons (mine were a light blue diamond-like one)
9.) 14" invisible zipper

I found a butterfly clip that reminded me of the butterflies that flew out of the Beauxbaton's hands when they arrived at Hogwarts.

How to Make the Fleur Delacour Beauxbatons Dress and Capelet:

Step 1: Cut out dress fabric. Though I did use the Simplicity 8050 - 1940s Vintage Dress Pattern, unless you are an experienced seamstress you might want to try an easier pattern. I ended up adjusting the front a bit because I couldn't get the lines to match up. I still think it turned out lovely and I would use the pattern again, but I'd probably get rid of the part in front where it darts to a point.
Simplicity Pattern 8050

Step 2: Sew the dress using the instructions that came with your pattern, with two exceptions. The first difference is that instead of using piece 7, substitute for my piece 7 below. Print each image below on 8.5 x 11" paper. Cut out the pattern below and use as described in pattern.

Just for fun, I added blue tinged crystal buttons to the front of the dress.

Step 3: Print the dress sleeve cuff pattern below and cut out using the instructions on the piece. Sew together coordinating pieces (there will be two complete cuffs per side, one in darker blue and one is marble blue.) Make sure to leave an opening on the side to turn the cuff right side out. Attach to sleeve edge as picture shows, making sure one of the cuffs is set slightly off from the other.

Wear you sew the cuffs to your dress, make sure to stagger the two different fabrics like I did here.
 

Step 4: Cut out and sew cape or caplet pattern. I modified this Cape Pattern: McCalls 4139 pattern


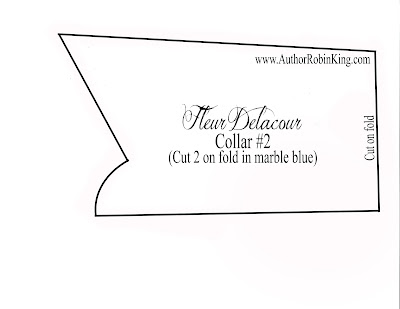
 Sew together the darker pieces of blue fabric you cut from piece #7 in Step 2 from above (Fleur Delacour Collar #1), making sure to leave an opening at the bottom (about 5 inches wide) to turn the collar right side out. Then cut out Fleur Delaour Collar #2 below (print on 8.5x11"):
by Author Robin King
Sew together collar #2, making sure to leave an opening at the bottom to turn the collar right side out. Iron collar #1 and #2 (don't worry about sewing the openings closed). Pin collars to the finished capelet so that the edge of collar #2 folds under the cape.


Add a hook and eyelet to close it and voila! You're done.

Sew a hook and eyelet to keep the cape closed.


TOTAL COSTUME COST: $36 Dress ($20 fabric, $10 pattern, $2 thread, $2 zipper, $2 buttons), $45 Hat ($30 hatshaper, $10 hood, $4 dye). $10 Shoes ($6 Used shoes, $2 blue paint, .50 leather fabric, $1.50 laces/cording) = $90


Make sure to wear a pair of black pantyhose with your dress. I hope you enjoy making your costume and geeking out with everything Harry Potter!


XoXo,

Robin

Friday, October 14, 2016

DIY Harry Potter: Fleur Delacour Beauxbatons Shoes


How to Make the Fleur Delacour Beauxbatons Shoes:
Step 1: Find a pair of old shoes with a pointed toe and heel. An oxford would be the best, but I couldn't find one. I found these ankle boots at my local Deseret Industries (a used clothing store) for $6. Clean them with a cloth and soap and water. Let dry.
Step 2: Print my pattern (below) on a 8.5" x 11" paper. You may have to adjust it to fit your shoe, but the general idea should be the same. The fringe part on the pattern should fit any shoe.
Step 3: Place wax paper on top of pattern. Trace the pattern of the heel and toe onto the wax paper (I used a permanent marker). Do this twice for both shoes so that you have 2 heels and 2 toes. You don't need to trace the fringe yet. Put tape over the traced part of the pattern. You are basically turning the pattern pieces into stickers. I used a combination of painter's tape and clear tape because the shiny surface of my shoes would only allow really sticky tape to adhere to it. Cut out the wax paper/tape in the correct shapes.
Step 4: If your base color of your shoe isn't what you want as your darker color, spray paint the darker color now and allow to dry for at least one day.  Since my shoes were black, I decided to just keep the black. In the movie it is more of a navy blue with a baby blue for the heel and toe. I picked this Rustoleum Ultra Cover Satin Wildflower Blue. Splurge on a spray paint that is for indoor/outdoor use and meant to cover to plastic or fabric. Adhere the "stickers" to the shoes, making sure it sticks really well at the edges. Cover the heel of the shoe with more tape so that when you spray paint the shoe it remains the darker color.
Step 5: Spray paint the shoes. I let the first coat dry and then did another coat. Let the paint dry before you remove the tape. At this point, your shoes will look like this:


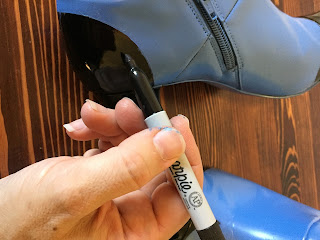
Remove the tape and clean up the edges with either some paint remover and a cotton swab, or some of the paint you used on your base coat. I even used a black permanent maker to make my edges perfect.
Using tape as a stencil/sticker isn't an exact science. There will be some bleeding of paint.
Luckily, you can fix it easily! I actually used nail polish remover and a cotton swab and then a Sharpie to fix mine.

Step 6: Cut out your fringe pattern piece, Place on top of your Leather Fabric. Pin. Cut out 2 fringe pieces. Since I got my fake leather on clearance in a maroon color, I spray painted black after I cut it out. If your leather isn't the same color as the base color of your shoe, paint it to match.


Step 7: Fold over your cut leather fringe pieces following the pattern and hot glue the fold over. Punch two small holes near the top by the fold. I used a Crop-o-dile, but you can use a hammer and a nail. Pull your leather laces or suede cording (like they use to make jewelry - I found 3mm suede cord at Joann Fabric in the jewelry-making aisle) through the holes and tie in a bow.


Step 8: Hot Glue or sew (it just depends on your shoe material) the fringe near the ankle of the shoe. If your shoe isn't a short boot like mine and it is more like a pump, you can shorten the fringe or even just tie fringe piece around your ankle using the cording and then tie it.


Before I glued on the fringe. See how I cleaned up the lines. You can't even tell I made any mistakes!

Hot glue the fringe on. You could probably use a shoe glue too.

You have to place it quick before the glue dries.

The finished product. Aren't they cute!?!

I think the fringe really makes the shoe look similar to the original in the movie.


I hope you enjoy making and wearing your shoes. Be sure to check out my posts on how to make the dress and cape (here) and how to make the hat (here)! Please send me your finished products and any shortcuts you found. I'd love to post them!

Don't they just go perfect with my Fleur Delacour Dress?
If you are throwing a Harry Potter party or book club, you have to check out my post here on Harry Potter and the Goblet of Fire and the rest of the books that we celebrated on DeliciousReads.com

XoXo,

Robin